![[실습] Elasticsearch NLP - Text Embedding과 KNN search 하기](https://img1.daumcdn.net/thumb/R750x0/?scode=mtistory2&fname=https%3A%2F%2Fblog.kakaocdn.net%2Fdn%2FcyL8Dy%2FbtsCSdazQQn%2FPv1GMTJkOEs929V3XrgHw0%2Fimg.png)
개요
- 목표 : ElasticSearch에서 NLP를 적용할 수 있다.
- 순서
- Elastic에 데이터를 올린다.
- Eland와 Elastic을 연동한다.
- Huggingface에서 모델을 선택해 탑재한다.
1. Elastic에 데이터 올리기
(1) Machine Learning > Data Visualizer 에 접근하여 데이터 파일을 선택한다.
(2) 데이터를 수정 없이 그대로 import 한다.
(3) Dev Tools의 Console에서 잘 데이터가 올라갔는지 확인할 수 있다.
GET {인덱스명}/_search추가로 해당 실습을 위해 Elastic Cloud 권한 설정을 한다.
(4) Elastic Cloud ML node 설정하기
자신의 Elastic Cloud Deployment > Edit에서 Machine Learning instance을 활성화 해야 한다.
2. Eland과 Elasticsearch 연동하기
Eland는 기계 학습을 위한 Python 클라이언트 및 툴킷으로 PyTorch 머신 러닝 모델을 업로드 할 수 있다.
(1) Eland를 설치하고 import하는 코드를 실행한다.
(저는 Google Colab에서 실행하였습니다.)
!pip -q install eland elasticsearch sentence_transformers transformers torch==2.0.1

from pathlib import Path
from eland.ml.pytorch import PyTorchModel
from eland.ml.pytorch.transformers import TransformerModel
from elasticsearch import Elasticsearch
from elasticsearch.client import MlClient

import getpass
(2) Elastic Cloud의 연동 정보를 입력한다.
es_cloud_id = getpass.getpass('Enter Elastic Cloud ID:  ')
es_user = getpass.getpass('Enter cluster username:  ')
es_pass = getpass.getpass('Enter cluster password:  ')
위 코드를 실행한 후 cloud id, id, pw를 입력한다.
(3) 연동을 확인한다.
es = Elasticsearch(cloud_id=es_cloud_id, basic_auth=(es_user, es_pass))
es.info()
3. Huggingface에서 모델 선택해 탑재하기
(1) model을 선택해 id와 task type을 설정한다.
hf_model_id='sentence-transformers/all-distilroberta-v1'
tm = TransformerModel(model_id=hf_model_id, task_type='text_embedding')

es_model_id = tm.elasticsearch_model_id()
(2) 모델을 다운로드한다.
tmp_path = "models"
Path(tmp_path).mkdir(parents=True, exist_ok=True)
model_path, config, vocab_path = tm.save(tmp_path)
(3) ES에 탑재한다.
ptm = PyTorchModel(es, es_model_id)
ptm.import_model(model_path=model_path, config_path=None, vocab_path=vocab_path, config=config)
4. 확인하기
(1) Deploy, Check 하기
# Elasticsearch ML list
m = MlClient.get_trained_models(es, model_id=es_model_id)
m.body

# Deploy
s = MlClient.start_trained_model_deployment(es, model_id=es_model_id)
s.body

# Check
stats = MlClient.get_trained_models_stats(es, model_id=es_model_id)
stats.body['trained_model_stats'][0]['deployment_stats']['nodes'][0]['routing_state']
위 코드에서 #Check 코드는 실행이 안될 수 있다. 이는 Elasticsearch에서 확인할 수 있다.
(2) Elasticsearch에서 확인하기
① Machine Learning > Model Management > Trained Models에서 방금 실행된 것을 확인할 수 있다.

추가로 Deployed 아이콘이 떠야 한다.
② 혹은 좌측 메뉴의 Notifications에서도 확인할 수 있다.

5. Text embedding 하기
(1) pipeline 생성을 위해 Dev Tools의 Console에서 아래 Query를 실행한다.
PUT _ingest/pipeline/vector_embedding_demo
{
  "processors": [
    {
      "inference": {
        "field_map": {
          "document": "text_field"
        },
        "model_id": "sentence-transformers__all-distilroberta-v1",
        "target_field": "ml.inference.document_vector",
        "on_failure": [
          {
            "append": {
              "field": "_source._ingest.inference_errors",
              "value": [
                {
                  "message": "Processor 'inference' in pipeline 'ml-inference-title-vector' failed with message '{{ _ingest.on_failure_message }}'",
                  "pipeline": "vector_embedding_demo",
                  "timestamp": "{{{ _ingest.timestamp }}}"
                }
              ]
            }
          }
        ]
      }
    },
    {
      "set": {
        "field": "document_vector",
        "if": "ctx?.ml?.inference != null && ctx.ml.inference['document_vector'] != null",
        "copy_from": "ml.inference.document_vector.predicted_value",
        "description": "Copy the predicted_value to 'document_vector'"
      }
    },
    {
      "remove": {
        "field": "ml.inference.document_vector",
        "ignore_missing": true
      }
    }
  ]
}- document : 재료가 될 document
- model_id : 사용할 모델의 id
- target_field : 모델을 거쳐 나온 결과를 저장할 field
- set : target_field를 field로 이름을 변경한다.
위 작업이 들어있는 pipeline을 구축한 것이다.
(2) 인덱스 템플릿 생성을 한다.
아래 코드에서는 인덱스가 들어가야 할 규칙을 정해준다.
PUT _index_template/movie_ratings_vector
{
  "index_patterns": [
    "movie_ratings_vector"
  ],
  "priority": 1,
  "template": {
    "settings": {
      "number_of_shards": 1,
      "number_of_replicas": 1,
      "index.default_pipeline": "vector_embedding_demo"
    },
    "mappings": {
      "properties": {
        "document_vector": {
          "type": "dense_vector",
          "dims": 768,
          "index": true,
          "similarity": "dot_product"
        },
        "document": {
          "type": "text"
        }
      },
      "_source": {
        "excludes": [
          "document_vector"
        ]
      }
    }
  }
}
mapping : decoumnet_vector의 설정들을 명시하고 있다.
(3) 모델을 확인한다.
GET _cat/ml/trained_models/sentence-transformers__all-distilroberta-v1(4) 벡터 인덱스로 리인덱싱한다.
기존 인덱스 데이터를 활용한 벡터 인덱스를 생성한다. 이는 copy의 의미이다.
POST _reindex
{
  "source": {
    "index": "movie_ratings"
  },
  "dest": {
    "index": "movie_ratings_vector"
  }
}
(5) 인덱싱을 확인하고 비교한다.
GET movie_ratings/_search
GET movie_ratings_vector/_search
GET movie_ratings/_mapping
GET movie_ratings_vector/_mapping
! 오류 해결 !
혹시 Console에서 코드 실행 중 409-Conflict Error가 난 경우에는 해당 model의 deploy 상태를 확인해야 한다.
(1) Machine Learning > Model Management 에서 해당 모델의 Pipeline을 확인한다.
아래와 같이 Failed가 많은 것을 볼 수 있다.
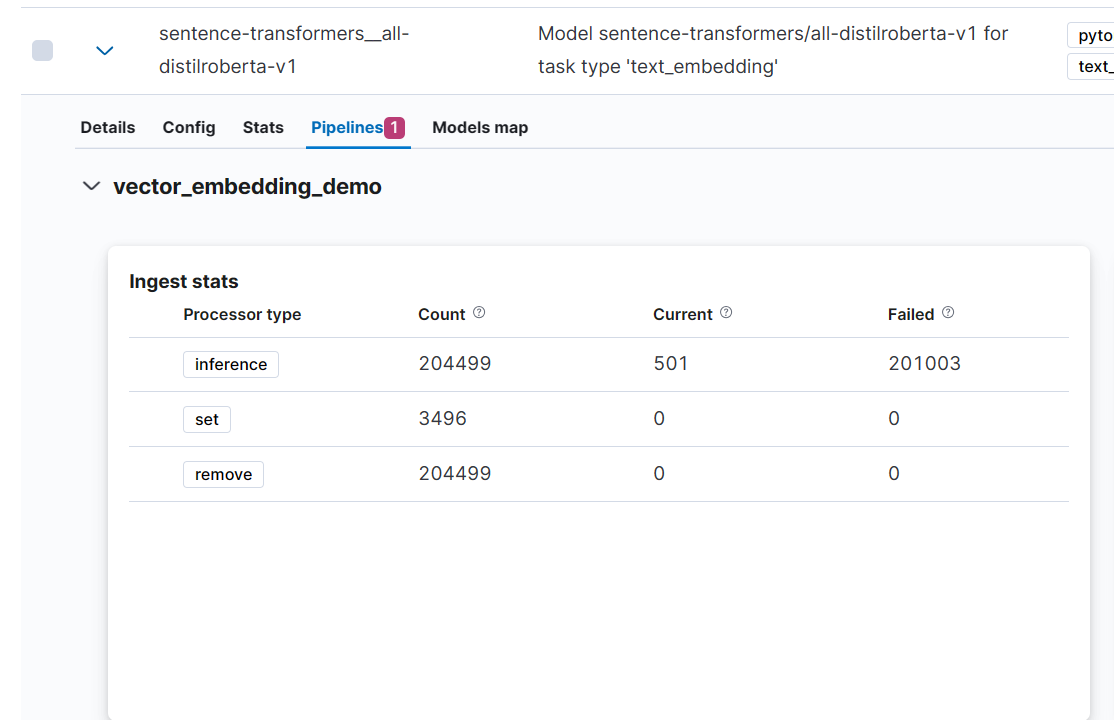
(2) 해당 모델의 Deploy 버튼을 클릭해 새로운 Stats 이름으로 Deploy 한다.
6. KNN Search 적용하기
(1) KNN Search Query를 작성한다.
GET movie_ratings_vector/_search
{
  "knn": [
    {
      "field": "document_vector",
      "k": 5,
      "num_candidates": 10,
      "query_vector_builder": {
        "text_embedding": {
          "model_id": "sentence-transformers__all-distilroberta-v1",
          "model_text": "갬덩"
        }
      }
    }
  ]
}
field : 대상
K : 후보군의 숫자
"갬덩"을 검색하는데 그럼 데이터에서 "갬덩"과 관련된 document들이 검색된다.
(2) KNN + BM25 Query를 작성한다.
GET movie_ratings_vector/_search
{
  "size": 10,
  "query": {
    "match": {
      "document": "연기"
    }
  },
  "knn":{
      "field": "document_vector",
      "k": 5,
      "num_candidates": 10,
      "query_vector_builder": {
        "text_embedding": {
          "model_id": "sentence-transformers__all-distilroberta-v1",
          "model_text": "좋아"
        }
      }
    }
}
document에 "연기"가 있을 경우 score가 상승한다. 따라서 "연기"와 매치 되는 document를 검색하고 KNN 기법을 통해 유사한 vector들을 검색하는 작업을 수행한다. 위 쿼리를 통해 연기에 대한 긍정적인 평가를 검색한다.
7. 모델 삭제하기
과금 방지를 위해 내가 올린 모델을 안 사용할 때는 꼭 삭제해준다.
POST _ml/trained_models/{모델아이디}]/deployment/_stop이는 Machine Learning의 Trained Model이나 Notifications에서 확인할 수 있다.
8. Python으로 데이터 전처리하기
NLP에서 흔히 하는 전처리로 소문자 변환, 앞뒤 띄어쓰기 제거 등의 텍스트 정규화 과정이 있다.
이를 위해 두 가지 함수를 Python으로 코딩하였다.
def normalize(input_string):
    """
     인풋으로 받는 스트링에서 정규화된 스트링을 반환함
     아래의 요건들을 충족시켜야함
    * 모든 단어들은 소문자로 되어야함
    * 띄어쓰기는 한칸으로 되어야함
    * 앞뒤 필요없는 띄어쓰기는 제거해야함
    """

    normalized_string = input_string.lower()
    normalized_string = ' '.join(normalized_str.split())
    normalized_string = normalized_str.strip()

    return normalized_string


def no_vowels(input_string):
    """
    인풋으로 받는 스트링에서 모든 모음 (a, e, i, o, u)를 제거시킨 스트링을 반환함
    """

    vowels = 'aeiou'
    no_vowel_string = ''.join(char for char in input_str if char.lower() not in vowels)


    return no_vowel_string
'Cloud > ElasticSearch' 카테고리의 다른 글
| [실습] Elasticsearch NLP - Vector Image Search 하기 (0) | 2024.01.02 |
|---|---|
| [실습] Elasticsearch NLP - Sentiment Analysis 하기 (0) | 2024.01.02 |
| [개념] Elastic NLP (0) | 2024.01.02 |
| [실습] Elasticsearch에서 Machine Learning 사용하기 (0) | 2023.12.29 |
| [개념] Elasticsearch에서의 Machine Learning (0) | 2023.12.29 |